This blog will chart my patisserie journey in Sydney, and beyond...
11 October 2010
A New Journey
A New Journey
It's close to my third week in Sydney and classes are starting in 2 days.
Never did I imagine that I would go back to school after graduating from varsity. But here I am, 2 years after graduating, in a foreign land to pursue my dream. My dream is to become a pastry chef, lovingly make all my breads and pastries, and bring some happiness to my customers and friends. So I have quit my job and enrolled myself in Le Cordon Bleu's Patisserie Diploma.
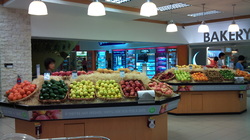
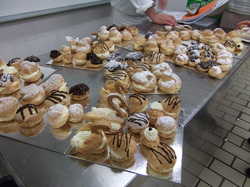
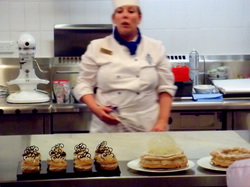
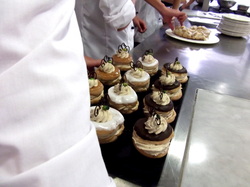
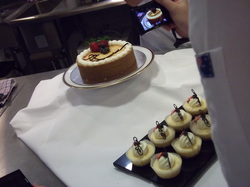
It wasn't that an easy decision to make, to leave my family, my friends, and my job. I loved my job at the supermarket. It gave me the space to think, create, recreate. It gave me the hands-on work that I so desired for. It gave me the satisfaction that I sought. This is my proudest re-creation. And I wish to thank my boss for supporting me, and my best buddy and my staff for helping me with the display setup.
Never did I imagine that I would go back to school after graduating from varsity. But here I am, 2 years after graduating, in a foreign land to pursue my dream. My dream is to become a pastry chef, lovingly make all my breads and pastries, and bring some happiness to my customers and friends. So I have quit my job and enrolled myself in Le Cordon Bleu's Patisserie Diploma.
It wasn't that an easy decision to make, to leave my family, my friends, and my job. I loved my job at the supermarket. It gave me the space to think, create, recreate. It gave me the hands-on work that I so desired for. It gave me the satisfaction that I sought. This is my proudest re-creation. And I wish to thank my boss for supporting me, and my best buddy and my staff for helping me with the display setup.
It still hasn't been an easy decision to move along with. The past weeks have been pretty rocky, but I guess things will smoothen out as the days go by. So do keep a lookout for 'em yummy stuff coming up! :)
13 October 2010
Just Before School Starts
I'm sitting at my desk, drinking a cup of hot milo-choc, and feeling extremely fidgety. Not sure why though. Might be because lessons start tomorrow. And oh well, I am thinking of the $170 weekly rent that I have to pay tomorrow. Sigh. Each week's rent could probably last me two whole months of groceries considering that I spend less than $20 a week on groceries. I'm just wondering and worrying whether the salary that I've saved over the past two years of work is enough...
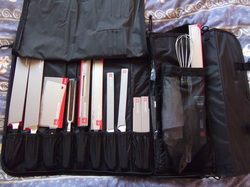
It's during these times that you really begin to take note of your finances, and you begin to appreciate the almost sheltered life that your hometown offers. I'd always complain about the taxi fares in Singapore, the 35% peak hour surcharge, the 50% midnight surcharge, but nah, that becomes inconsequencial when you step into a situation like mine. The first time I truly understood the meaning of "burning a hole in your pocket" was when I paid up for the first term's course fees. And everyday here I feel the pinch. A one-way bus trip to the city costs around $4 (god knows how much the taxi fare would be), one meal outside costs an average of AU$10 - you get the picture. So I actually cook for all my meals - one cook to last 5 days' dinner. It's really economical and great for me as I'm not anywhere close to being a fan of cooking. So most of these knives which came in my toolkit will probably remain where they are.
It's during these times that you really begin to take note of your finances, and you begin to appreciate the almost sheltered life that your hometown offers. I'd always complain about the taxi fares in Singapore, the 35% peak hour surcharge, the 50% midnight surcharge, but nah, that becomes inconsequencial when you step into a situation like mine. The first time I truly understood the meaning of "burning a hole in your pocket" was when I paid up for the first term's course fees. And everyday here I feel the pinch. A one-way bus trip to the city costs around $4 (god knows how much the taxi fare would be), one meal outside costs an average of AU$10 - you get the picture. So I actually cook for all my meals - one cook to last 5 days' dinner. It's really economical and great for me as I'm not anywhere close to being a fan of cooking. So most of these knives which came in my toolkit will probably remain where they are.
It kinda sucks being on a budget, but I guess you'll really learn how to manage your finances properly this way (and you inadvertently learn how to cook too).
And so I'm sitting here, sorely missing my $2 chee cheong fun and yam cake, my mee pok, char kway teow, yong tao foo, my beloved roti prata and the roti prata man who always cracks us up with his comments.
And so I'm sitting here, sorely missing my $2 chee cheong fun and yam cake, my mee pok, char kway teow, yong tao foo, my beloved roti prata and the roti prata man who always cracks us up with his comments.
14 October 2010
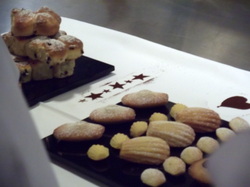
Plain Scones with Jam and Creme Chantilly
We had our first lesson today and we made plain scones. The best scones I ever had was in a little off-road motel in Santa Barbara, USA, more than 10 years ago, where we had 'em freshly made in the morning by the owner for our breakfast. I never thought I'd taste those again. In Singapore, the closest I got to eating scones was from the supermarket's bread section, and those were pretty hard. So over the years I was made to believe that scones were supposed to be kinda hard.
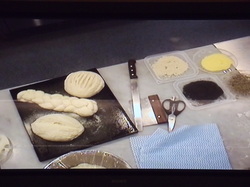
But today I went back 10 years in time. Thanks to Chef Gert who made these wonderfully fluffy scones during the demonstration. We learnt about batching versus free-standing. Batching is to place the dough pieces close together on the tray so save space and to minimise dry-out. Free-standing is just to place them apart from each other. I don't really like batching 'cos the scones come out stuck together at the sides and when you break them off the appearance is affected a little and becomes a little angular-shaped too. See the difference below? The sultana scones on the left were baked by batching whereas the plain scones on the right were baked free-standing.
But today I went back 10 years in time. Thanks to Chef Gert who made these wonderfully fluffy scones during the demonstration. We learnt about batching versus free-standing. Batching is to place the dough pieces close together on the tray so save space and to minimise dry-out. Free-standing is just to place them apart from each other. I don't really like batching 'cos the scones come out stuck together at the sides and when you break them off the appearance is affected a little and becomes a little angular-shaped too. See the difference below? The sultana scones on the left were baked by batching whereas the plain scones on the right were baked free-standing.
We had to make our own scones after the demo. After I made mine, Chef came over to my bench and remarked, "wow, your scones are big!" Well, that was because the smaller cutters had already been taken by other students so I just used one of the bigger cutters left. But Chef decided after pressing my scones to test the texture that it was worth his trying, so he tried my scones and he said they were really nice, not once but 3 times. Heh. So that ended my day on a nice note.
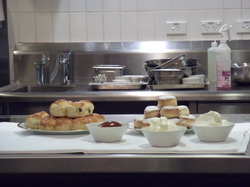
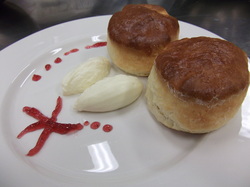
These were the scones I presented. See the two dollops of Chantilly cream on the plate? One's made by Chef and the other's made by me. And we have to make that just by using a spoon and some warm water. See the difference? It's not easy to make the dollop as nice and smooth as Chef does.
These were the scones I presented. See the two dollops of Chantilly cream on the plate? One's made by Chef and the other's made by me. And we have to make that just by using a spoon and some warm water. See the difference? It's not easy to make the dollop as nice and smooth as Chef does.
I have scones for my breakfast tomorrow. Goodbye to plain sliced bread from the supermarket...
15 October 2010
Fruit Scones, Madeleines and Friands
Might call it a triple feast today, eh? We made fruit scones, madeleines and friands.
For the fruit scones, we used the creaming method today, which is basically to cream the butter and sugar first, then add in the other ingredients. Yesterday we used the rub-in method, which is to combine all the dry ingredients first and then rub in the fat (butter). Personally, I prefer the rub-in method. I've always used the creaming method back home but first lesson using the rub-in method has got me hooked onto it. My scones texture also seems more fluffy when I use the rub-in method. Chef Michael gave us single size cutters today, so the scone size was about a third of what I made yesterday. Anyway, my scones turned out much more even in shape than yesterday so I was pretty pleased, 'cos I made sure I rolled out the dough evenly today. Only I rolled it out a little thin. Chef said to roll it thicker next time so it has more height and looks prettier, and also to knead it a little more so that the scones turn out really smooth on the outside when baked.
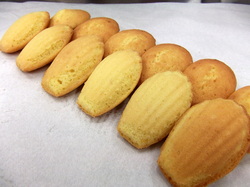
Madeleines and friands: we made them in small quantities and since we aren't going to be tested on them, my bench partner Edna and me decided to make them together. Saves lots of time and we were the first to finish in the kitchen - one whole hour ahead of time! The madeleines are pretty soft and fluffy, while the friands are a little more on the crispy side.
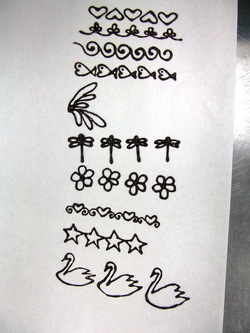
Because Edna and me finished early, Chef tempered some chocolate for us to practice our writing. Chef said my writing was nice. :) I love my swan drawing the most. Pity I drew them last and my hand got a little tired so the sizes weren't that equal. And next time I will cut the tip even smaller so that the pipings will be finer.
17 October 2010
Genoise Sponge and Gateau Weekend
A day late in posting, but was too tired to post last night after class.
So, first week of class ended on a weekend, Chef rushed us during class, and we fittingly made two cakes called genoise (gee-nwaz) sponge and gateau (gah-tow) weekend.
So, first week of class ended on a weekend, Chef rushed us during class, and we fittingly made two cakes called genoise (gee-nwaz) sponge and gateau (gah-tow) weekend.
Genoise sponge is made up of a sponge cake, sliced in two and sandwiched with jam and thickened cream. It takes it name from the city of Genoa in Italy. It is unlike your usual sponge cake which usually requires for egg yolks and whites to be beaten separately: this cake requires whole eggs to be beaten with sugar over a bain-marie (water bath) until ribbon stage. You can beat it by hand. It would take about half an hour plus a sore arm. Or you could be smart and pleasantly ask the Chef for permission to use the electric mixer. The cake also does not make use of any chemical leavening agent such as baking powder, relying solely on air bubbles formed during mixing to rise in the oven. Because of this, the batter has to be mixed gently in order to retain the volume of the batter, otherwise you'd get sunken cakes. And the cream that goes in the middle?...we had to beat it until piping consistency by hand..god...make that a super sore arm.
I don't like this cake. It's too rich with all that cream. Looks nice when you make it but I think cutting it up is quite a nightmare as the cream gets squashed and all.
Now, the weekend gateau was a much nicer cake. This is a pound cake soaked with lemon syrup, made in a gugelhopf tin. This is what I made:
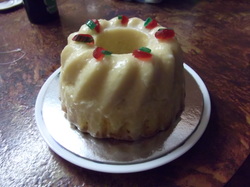
Nice? I love the shape so much that I bought myself a gugelhopf tin today. :) The taste is quite nice too; could have been nicer if there had been more lemon syrup in it. Chef was rushing us like mad towards the end and I didn't have enough time to soak it properly, and didn't have time to coat the edges with almonds and dust with icing too. But love the cake anyways. Looks so chrismassy with the glacied fruits on top. I will make one for Christmas when I get home in December.
Rest day is almost over. Got my clothes washed and ironed, bought my groceries and cooked for next week, made a trip to Rozelle to get some baking tools, and finally bought my Reject Shop toolbox for $5, so I don't have to carry my M16 toolkit around anymore.
Rest day is almost over. Got my clothes washed and ironed, bought my groceries and cooked for next week, made a trip to Rozelle to get some baking tools, and finally bought my Reject Shop toolbox for $5, so I don't have to carry my M16 toolkit around anymore.
21 October 2010
Fruit Flan
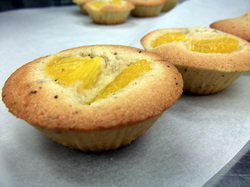
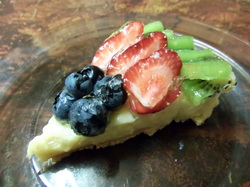
Second week of classes has begun. We started off this week with a fruit flan. This is a really important lesson because we have to make and present a fruit flan for one half of our practical exam at the end of the term. Chef Gert was so happy with the fruit flan that he made for us that he decided that he had to snap a photo of it himself for momentos sake I guess, heh.
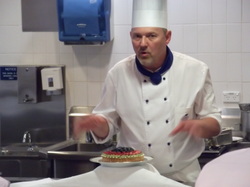
So please meet Chef Gert - he's a great chef and teacher.
Anyways, the flan wasn't difficult to make. We got to use my favourite rub-in method again, which is to rub-in the fats into the dry ingredients. This helps to coat the gluten strands (protein) in the flour with fats so that they don't absorb too much moisture and become all soggy when you add the wet ingredients in. We also have to chill the pastry just before baking to relax the gluten, to minimize shrinkage and unevenness during baking. So that takes up abit of time. But in between we also made some dough for our Hollander biscuits which we are going to make tomorrow.
For the pastry cream, we were given one whole vanilla bean even though the recipe only asked for a quarter. Well I added one whole bean into my pastry cream. Chef gave us a pod each so why not? Back home I'd just use cheap extract 'cos vanilla beans cost about $15 each. I like the more fragrant taste of the cream that I made anyway, but I must remember not to cook my cream for too long. 2 min on 78dc is enough for the cream to hold its temperature.
Didn't like the crust though. Maybe I overbaked it a little. Might try using icing sugar instead of castor sugar to achieve a more crumbly, melt-in-the-mouth texture. And yeah, we were taught the meaning of blind bake today, which is basically to bake the pastry base without any filling.
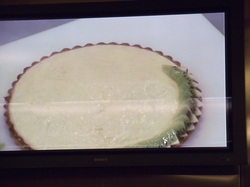
And gosh, 'cos I was rushing for time, I didn't make my flan gel hot enough so the glaze turned out lumpy. So I need to practise at home. Now I need to go get some bakers flour etc. And if I could choose, I would make 2 or 3 small tarts instead. Really, cut tarts don't look that good.
This is what I made anyway. I must practice and get 100% for my exam muahahaha.
Anyways, the flan wasn't difficult to make. We got to use my favourite rub-in method again, which is to rub-in the fats into the dry ingredients. This helps to coat the gluten strands (protein) in the flour with fats so that they don't absorb too much moisture and become all soggy when you add the wet ingredients in. We also have to chill the pastry just before baking to relax the gluten, to minimize shrinkage and unevenness during baking. So that takes up abit of time. But in between we also made some dough for our Hollander biscuits which we are going to make tomorrow.
For the pastry cream, we were given one whole vanilla bean even though the recipe only asked for a quarter. Well I added one whole bean into my pastry cream. Chef gave us a pod each so why not? Back home I'd just use cheap extract 'cos vanilla beans cost about $15 each. I like the more fragrant taste of the cream that I made anyway, but I must remember not to cook my cream for too long. 2 min on 78dc is enough for the cream to hold its temperature.
Didn't like the crust though. Maybe I overbaked it a little. Might try using icing sugar instead of castor sugar to achieve a more crumbly, melt-in-the-mouth texture. And yeah, we were taught the meaning of blind bake today, which is basically to bake the pastry base without any filling.
And gosh, 'cos I was rushing for time, I didn't make my flan gel hot enough so the glaze turned out lumpy. So I need to practise at home. Now I need to go get some bakers flour etc. And if I could choose, I would make 2 or 3 small tarts instead. Really, cut tarts don't look that good.
This is what I made anyway. I must practice and get 100% for my exam muahahaha.
22 October 2010
Sables Diamantes and Viennese Biscuits
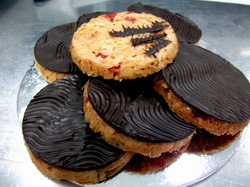
We moved into biscuits today. Essentially we made a biscuit called Sables, in quite a few forms. Sables is French for 'sand', and the biscuit is so named because of its sandy, crumbly texture. It tastes similar to shortbread, and has a slight melt in your mouth texture.
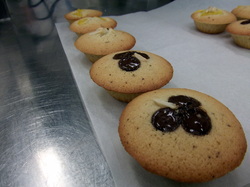
First we made piped sables, also known as Viennese biscuits. We had to put 30ml of rum inside the mixture - the rum by itself smelt horrible but once it was mixed in and baked, I couldn't really smell or taste any rum in the biscuit. We piped these biscuits in various shapes like circles, lines, horseshoes, heartshapes, ribbon shapes, swirls, yeah you could pipe any design you like. And we decorated with almond bits, cherries and tempered chocolate.
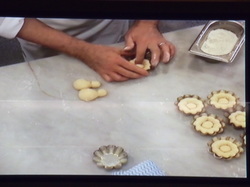
Second we made round sables, also known as Sables Diamantes (pronounced as Sah-blay Di-mon-tea). This is more like a refrigerator biscuit. We roll the dough into logs and chill it before slicing them up into rounds.
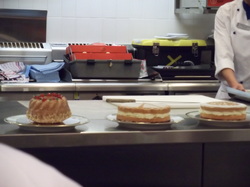
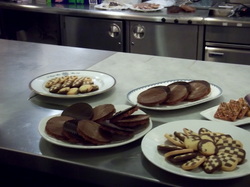
So the pictures below are (from top to bottom): Chef's, mine, and some of my classmates' work. Today was out first lesson which we were being graded in the kitchen, on how we work, how we keep our workbench neat and tidy after each task is completed, and of course how we make and present our baked products. Dunno what grade I got though. I was so tired 'cos my hand cramped up and made it difficult for me to work with my dough, so I didn't finish up my checkerboard dough which we are going to work on for tomorrow's lesson. But it's ok, I'll just quickly finish it up tomorrow.
First we made piped sables, also known as Viennese biscuits. We had to put 30ml of rum inside the mixture - the rum by itself smelt horrible but once it was mixed in and baked, I couldn't really smell or taste any rum in the biscuit. We piped these biscuits in various shapes like circles, lines, horseshoes, heartshapes, ribbon shapes, swirls, yeah you could pipe any design you like. And we decorated with almond bits, cherries and tempered chocolate.
Second we made round sables, also known as Sables Diamantes (pronounced as Sah-blay Di-mon-tea). This is more like a refrigerator biscuit. We roll the dough into logs and chill it before slicing them up into rounds.
So the pictures below are (from top to bottom): Chef's, mine, and some of my classmates' work. Today was out first lesson which we were being graded in the kitchen, on how we work, how we keep our workbench neat and tidy after each task is completed, and of course how we make and present our baked products. Dunno what grade I got though. I was so tired 'cos my hand cramped up and made it difficult for me to work with my dough, so I didn't finish up my checkerboard dough which we are going to work on for tomorrow's lesson. But it's ok, I'll just quickly finish it up tomorrow.
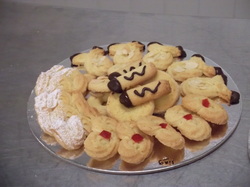
As for what I thought of the biscuits? I didn't think they were fabulous. Yeah, nice to eat but I wouldn't go crazy over them. Tastes pretty normal, looks pretty normal (though tomorrow's biscuits would definitely look a little more interesting - trust me on that). Give me a gateau weekend or some warm scones over these anytime.
23 October 2010
No Reservations
Tired from a long day at school, I watched No Reservations on Sydney's GEM Channel last night, starring Catherine Zeta Jones and Aaron Eckhart. It's about a high-flying but reclusive chef who takes her life and work over-seriously, and whose life starts to change after her sister dies in a car accident and she becomes guardian of her young niece. It's a pretty nice show because it challenges to some extent the conventional ideas regarding feminity, motherhood, parenthood even: for instance, on being a female chef, on the kind of life she lives and the kind of environment/ attitude which she brings her niece up in.
I think it didn't receive too many plaudits or anything like that but well, I think it's worth a watch. Catch it if you can!
I think it didn't receive too many plaudits or anything like that but well, I think it's worth a watch. Catch it if you can!

23 October 2010
Florentines and Hollander Biscuits
We're moving around the world! And need to get a little technical (i.e. the following technical bits are going to come out for the exam...)
Florentines are Italian biscuits, named after the Italian city of Florence. They are made largely from almond flakes and glacied fruit, and coated with a layer of chocolate. The biscuit itself was simple enough to make, but it was putting on the chocolate that created lots of trouble. Why? Well, first we had to temper the chocolate. Tempering is the process of precrystallising chocolate, to introduce enough stable cocoa butter crystals to cause rapid crystallisation for the rest of the cocoa powder. Sounds too much of a mouthful? Ok, let's make it simple huh. Basically tempering is to melt the chocolate to the right temperature so that when you spread it out on a surface, it will set/ harden.
There are three methods of tempering.
1. Tabling - This involves pouring some of the melted chocolate onto a cool marble slab to crystallise and then mix it back into the mixture again.
2. Vaccination - This involves adding tempered chocolate to melted chocolate. So first you heat up some chocolate callets (chips) over a bain marie (water bath), then you take it away from the heat and melt another 1/3 portion of callets using the heat of the mixture.
3. Direct warming - This is basically to melt all the callets over a bain marie. Chef said some people associate the direct warming method with vaccination method. I always used the direct warming method at home (and I never even used a bain marie; always used the microwave heh), but Chef says the vaccination method will give the chocolate a shiny finish.
There are actually specific temperatures to heat, cool and reheat dark, milk and white chocolate, but Chef said just to make it a tactile experience. No need to use temperature gauges - just use your sight and touch to tell if you have tempered the chocolate at the right temperature.

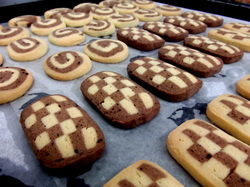
We also baked our hollander biscuits today, 2 days after assembling the shapes. These are refrigerator checkerboard design biscuits, so you can make them in advance, store them in the freezer, and slice some to bake when you feel like a homemade cookie. This biscuit is yummy I must say. It's really fragrant and has that wonderful melt-in-your-mouth texture. So much nicer than yesterday's biscuits. And it's great cos if you have any leftover dough you can create really pretty designs like spirals and marbled finishes. I'll be baking these Hollanders and my weekend gateau for Xmas when I get home :)
24 October 2010
Mooching Around On A Rainy Rest Day
The drizzle's an absolute damper. It's supposed to getting all hot nearing summer and the weather was all fine and dandy for the past week but it just had to rain today. And the weatherman forecasts poor weather for the next couple of days too.
Anways, I ironed my uniform! The exclamation's 'cos some people say lefties tend to have trouble doing things as most things are designed for righties...don't you just feel like making a -_-" face at me now?
Still had leftover sweet short pastry from making fruit tart the other day, so I rolled some out and baked egg tarts. Yum yum. And I cooked some pasta with celery and ham for dinner.
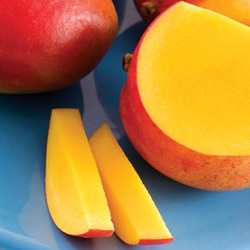
So I was also mooching around the supermarket late afternoon, and I saw some interesting things I haven't seen back home before...such as apple cucumber and strawberry mango.
Anways, I ironed my uniform! The exclamation's 'cos some people say lefties tend to have trouble doing things as most things are designed for righties...don't you just feel like making a -_-" face at me now?
Still had leftover sweet short pastry from making fruit tart the other day, so I rolled some out and baked egg tarts. Yum yum. And I cooked some pasta with celery and ham for dinner.
So I was also mooching around the supermarket late afternoon, and I saw some interesting things I haven't seen back home before...such as apple cucumber and strawberry mango.
And now I have to STUDY. 'Cos there's a test next week. Ugh. Why can't we just have 100% practical exams instead?
26 October 2010
720PM
The infant in the sky blushes
The wind starts a quiet anthem and
The red-tipped brushes sprinkle single-coloured confetti on the pathways
As the guards line up their shields
A solemn tune to cradle the baby
As her mother gently covers her with an old cotton fleece
The wind starts a quiet anthem and
The red-tipped brushes sprinkle single-coloured confetti on the pathways
As the guards line up their shields
A solemn tune to cradle the baby
As her mother gently covers her with an old cotton fleece
28 October 2010
Cream Puffs/ Profiteroles
Today was our first lesson on choux pastry, which is a light type of pastry that is made up of water, butter, bakers flour and eggs. Water is the key ingredient here to making the pastry puff up real high in the oven. The lesson itself isn't that difficult, but you have to be careful not to overcook the pastry (2min on the stove is all you need), and when you put it in the oven, you musn't open the oven until the pastry is golden brown and properly puffed up otherwise they will sink.
Usually cream puffs are just filled with chantilly cream but Chef Gert taught us to add a little strawberry or apricot jam inside before you pipe in the cream. It tastes so much more yummy with the jam I must say.
We also did some fondant to coat the tops of the profiteroles and we'll be doing that again tomorrow.
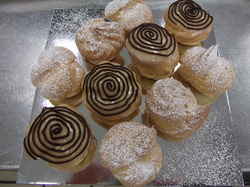
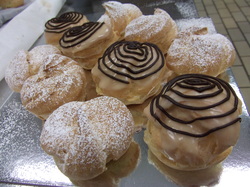
See the swan in the last picture? Pretty? :) That was done by one of my kitchen mates. Chef Gert showed us a drawing in demo class on how to pipe the swan. I got my swan parts too but didn't have enough cream to fill the swan. On second thought I should have done up my swan first! The chantilly cream recipe wasn't enough and you could see quite a few students with empty profiterole shells. Mine was almost there, just missing a couple heh. Ok time to study for my test again. Watch out for other versions of choux pastry for the rest of this week...
29 October 2010
A Test and Coffee Eclairs
We had our first theory test today on developing and updating hospitality industry knowledge. Guess what? I was first to walk out of the room. Haha. And I passed with flying colours. During times like these you just love the benefits of the very stressful and rigorous education in Singapore. We always complain it's so tough studying and getting good grades back home, but honestly, the Singapore way of doing it really makes life much easier when we're studying here. At least we can focus on the kitchen practicals and not worry too much about the theory exams. Charis and me got off from class an hour early 'cos both of us finished the test in real quick time, so we went shopping at Top Ryde for a calling card and a piece of sushi.
Second practical lesson on choux pastry, but we did coffee eclairs today. Eclairs seemed harder to make. Yesterday most of the class were finished at least half an hour ahead of time. Today most of us were half an hour behind time. Well, that's due to a few reasons. First, we had to do patisserie cream instead of chantilly cream for the eclairs, so making cream patisserie was more time consuming, 'cos you have to boil and refrigerate etc, unlike chantilly cream where you just whip the cream, icing sugar and vanilla extract together. Second we had to temper fondant to glaze the eclair tops. And we have to get the fondant to 37 degrees celcius so that it will be shiny and be able to set at the same time. Thirdly, the eclairs don't balance as well as cream puffs, expecially since we actually use the base as the top, so the top which is a little rougher becomes the eclair base and that makes it more wobbly. This lesson is also very important because it is going to be tested in the practical exam. So we have to make fruit flan and coffee eclairs for our exam. Maybe that's why we were asked to use patisserie cream instead of chantilly cream for our eclairs - kill two birds with one stone (fruit flan uses patisserie cream too).
Second practical lesson on choux pastry, but we did coffee eclairs today. Eclairs seemed harder to make. Yesterday most of the class were finished at least half an hour ahead of time. Today most of us were half an hour behind time. Well, that's due to a few reasons. First, we had to do patisserie cream instead of chantilly cream for the eclairs, so making cream patisserie was more time consuming, 'cos you have to boil and refrigerate etc, unlike chantilly cream where you just whip the cream, icing sugar and vanilla extract together. Second we had to temper fondant to glaze the eclair tops. And we have to get the fondant to 37 degrees celcius so that it will be shiny and be able to set at the same time. Thirdly, the eclairs don't balance as well as cream puffs, expecially since we actually use the base as the top, so the top which is a little rougher becomes the eclair base and that makes it more wobbly. This lesson is also very important because it is going to be tested in the practical exam. So we have to make fruit flan and coffee eclairs for our exam. Maybe that's why we were asked to use patisserie cream instead of chantilly cream for our eclairs - kill two birds with one stone (fruit flan uses patisserie cream too).
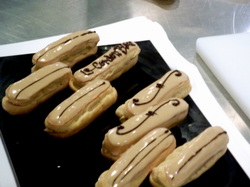
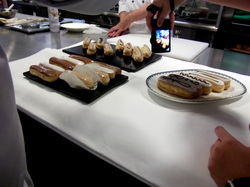
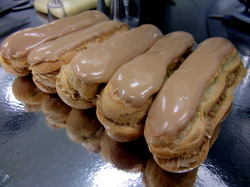
Yup, the first two are Chef Michael's creations. The last one is mine. Didn't have time to do some chocolate writing on top but it's ok. Chef said it's not required for the exam. They are looking for accurate length (12cm), right width, consistency in shape, neat piping of cream, shiny and smooth fondant coating. Hmm, some of my kitchen mates did really nice cream piping inside the eclairs. Chef asked me just to make my cream a little higher or pipe another line on top of what I did so that the cream will show better. And I asked him why my fondant coat seemed to crack a little when dry and he said it was 'cos it was a little thick. And yeah, he said the length was good but the width could be a little wider to make the shape perfect. So yup, I must work on these tomorrow. Hopefully I can do a few to practice tomorrow. Hmm, wonder if there is a final practice lesson before the exam. The oven in this house doesn't distribute heat that evenly - choux pastry probably wouldn't work well here.
Well, I guess I haven't posted a photo of Chef Michael to properly introduce him but he's a really great chef as well. Most of the chefs at school are great - encouraging and teach you where you've gone wrong.
And I really just prefer my choux pastry with chantilly cream and jam. The patisserie cream plus the fondant is way too sweet for my liking.
30 October 2010
Paris Brest
Third lesson on choux pastry. The most important thing in making choux (pronouced as shu) pastry is to ensure gelatinization of the starch. We achieve this by bringing fat and water to the boil, then adding in bakers flour and cooking until the starch granules in the flour absorb all the liquid and swell in size. The second most important thing is to ensure you let the pastry dough cool to below 60 degrees celcius before mixing in the eggs, otherwise you would be cooking the eggs. We had the option to mix in the eggs by machine but I just used my hand. I like the feeling, tiring but satisfying - Chef Luigi says it's the school way of offering us free gym membership, heh.
Paris Brest is a type of donut-shaped choux pastry filled with praline mousseline and dusted with icing sugar. The pastry was made to commemerate a cycling race between the cities of Paris and Brest, and its traditional donut shape is meant to represents the wheels of the bicycle.
The normal paris brest is quite a large piece of pastry - about 15cm in diameter. I don't like it because as you know, the whole pastry loses its shape once you cut it. So if you don't like them too big you can actually do smaller sized pastries about slightly less than half the original size.
Praline mousseline is basically pastry cream with the addition of praline and whippd butter. It has quite a nice taste, not too thick or sweet. It really just tastes like pralines (small chocolates) but with less intensity in flavour.
However, I was getting really sick of having to try all the choux pastry and the cream and sweet stuff. Didn't seem to be able to feel very creative today, so I just skipped doing all the chocolate and fondant icing. I just piped the mousseline straight in and gave it a little dust of icing sugar.
If the oven back home works alright, I will try deep frying after making the choux pastry. I think it makes what they call churros...Spanish donuts...yum yum...
4 November 2010
Fourth Week and Learning About Puff Pastry
We're into the fourth week of school and this week we're learning about puff pastry. In French it's called feuilletage, which means "leafy" - referring to the many delicate layers in puff pastry. The ingredients in puff pastry are flour, salt, water and fat. Its origins are not certain. Some people say it was created by a baker who wanted to make a pastry that was not too sweet for his father. Others say it was created by a baker whom, one day, forgot to add butter to his mixture, and thereafter tried to incorporate the butter by rolling it into the dough.
Before I went for lessons today, I did a read-up on the Internet and some books from the library, as Chef Karen had advised us the week before to do so. I must say it really helped, 'cos having already grasped the technical terms and the various methods of making puff pastry, I could focus on what Chef was doing during the demo. I really wasn't keen on this week's lessons after reading on the horrendous amount of butter that goes into making the pastry, but I must say after today's lesson I love puff pastry (making it that is....I'm still indignant about the amount of butter that goes into it!)
There are 3 main butter to flour ratios for making the pastry. Full pastry is when the amount of butter equals to the amount of flour, e.g. 1kg of butter with 1kg of flour. And then we have the 3/4 pastry as well as the 1/2 pastry. We did 3/4 today. More butter gives more flavour I guess, but commercially I think most people use the 1/2, 'cos it saves production costs with less butter required.
The first step in making puff pastry is to create a detrempe, which is basically a dough made from flour, salt and water. Thereafter, there are 3 ways of making puff pastry - French, English and Scotch. French and English are similar in the fact that they utilise the lamination technique to incorporate the butter into the dough, which is to wrap the dough over a single flat piece of butter and then roll the dough out over 5 or 6 turns. The Scotch way is the jungle man way - chop up the butter into small pieces and just work it into the dough over 4 turns. There is no difference in taste, but the French and English methods will produce nicer looking puff pastries with more layers in between.
"Turns" refers to the number of times you roll and fold the dough. We have the single fold, which is to fold the rectangular-shaped dough into 3 parts, and we have the double fold, which is to fold the dough from the 2 sides to the centre, and then into another half - like a book.
So that's what we did for the entire lesson today. Make the French, English, and Scotch. Roll and fold, roll and fold. And in between we also made beef bourgoignon filling for the puff pastry pie that we are making tomorrow. Love the feeling of rolling the dough...it's therapeutic. Pity though, I made an error whilst making the English pastry - I put the butter in the centre to be folded instead of two-thirds to one side, but I don't think it would affect the final product. Probably it'll just turn out like the French. No pictures today because we just made the dough. Will have some up tomorrow when we assemble and bake some of those wonderful puff pastry.
Plus, so happy I got full marks for theory test 1...hopefully tomorrow's presentation will be good too. Goodnight world...
5 November 2010
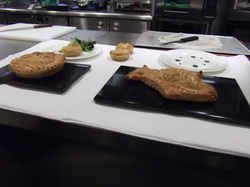
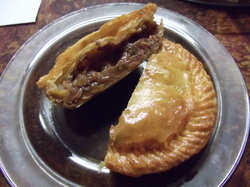
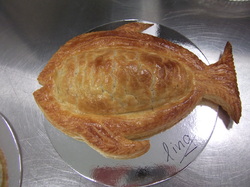
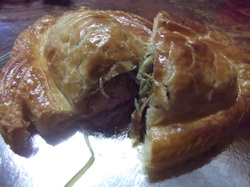
Beef Bourgoignon Pie and Salmon En Croute
So....we rolled the puff pastry yesterday...and we used them today. I think today is the first lesson we made savoury pastries instead of sweet pastries. A nice change, I should say.
Today is a cold and rainy day, but I was looking forward to lessons and woke up bright and early at six as usual. First up was beef bourgoignon pie. The pie filling was made yesterday - it's made of diced beef cubes, bacon, mushrooms, red wine, tomato sauce, and some seasoning for flavour. So today we just had to roll out the dough for the pie base and top, put in the filling, and bake.
Second up was salmon en croute. "en croute" is french, and basically means "in pastry", so the name means "salmon in pastry". That's basically what we did. Half-cook a piece of salmon fillet, stir-fry some leeks (julienne i.e. cut into long thin strips), and wrap the them up in puff pastry to bake. Had lots of fun doing the pastry because we had to cut out a fish-shape free hand, and you could see students making so many different kinds of fish.
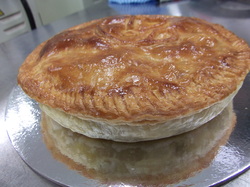
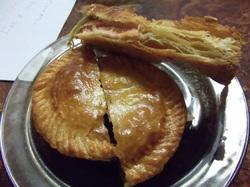
The puff pastry on its own is really quite nice. You can really taste the butter and taste that it's freshly made and not made from some production line. But I don't understand why the outermost layer is kind of tough whereas the inside is flaky and nice. I will ask Chef tomorrow.
I'm not a fan of beef and salmon, but it tasted pretty good for an amateur baker like me haha. And saved me the trouble of cooking dinner tonight too...
POWER! And tomorrow we're making.....you'll find out tomorrow :)
I'm not a fan of beef and salmon, but it tasted pretty good for an amateur baker like me haha. And saved me the trouble of cooking dinner tonight too...
POWER! And tomorrow we're making.....you'll find out tomorrow :)
6 November 2010
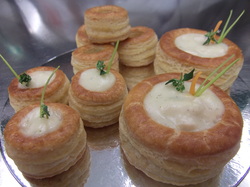
Vol-Au-Vents, Bouchees, Pithivier and Palmiers
It's a mouthful, and could be a handful in the kitchen too, but of course with good teamwork (like Chef Michael keeps stressing) the workload is manageable.
Vol-Au-Vents (pronounced as voo-la-vaunts) is a French term, and refers to a small hollow puff pastry case which can be filled up. Bouchees (pronounced as bou-shays) are simply smaller versions of vol-au-vents. We assembled and baked these, and filled them with cream chicken filling which we made this afternoon. I like my pastry cases because they rose well and evenly, but I think I could have made them a little higher (roll out pastry thicker) so that the final product would be more impactful.
Vol-Au-Vents (pronounced as voo-la-vaunts) is a French term, and refers to a small hollow puff pastry case which can be filled up. Bouchees (pronounced as bou-shays) are simply smaller versions of vol-au-vents. We assembled and baked these, and filled them with cream chicken filling which we made this afternoon. I like my pastry cases because they rose well and evenly, but I think I could have made them a little higher (roll out pastry thicker) so that the final product would be more impactful.
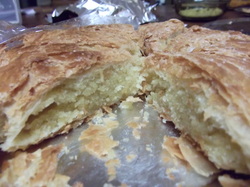
Using the French puff pastry which we made previously, we also made a Pithivier, which is a round enclosed pie usually made with puff pastry and filled with frangipane / almond cream, and dusted with icing sugar during the last few minutes of baking to give it a high shine. It's supposed to have originated from the French town of Pithiviers. Anyways, the cream is made up of butter, sugar, eggs, flour and the main ingredient almond meal. It has a texture similar to mousse but when you bake the pie, the filling becomes really nice - like the texture of a soft moist cake. I had lots of fun making this pie, 'cos I wanted to try out a new design which I thought of last night whilst browsing the Internet for some Pithivier ideas. Traditionally Pithivier is made with petal shapes around it and then with curved lines running from the centre of the pie to the sides. But I didn't want to do it like everyone else so I carved mine out like a circular dagger...Chef said he liked it. I like it too but the downside is that because the curved parts are a little thin, it cooked faster than the centre of the pie, which is why you can see the sides are a little darker than the centre. Love this pie anyway. Love the shape and the taste.
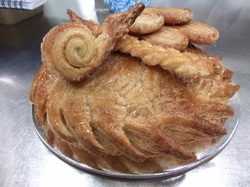
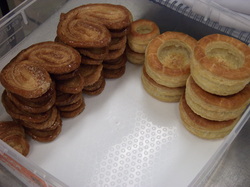
The decoration on top? Those are actually palmiers that we made today also. Palmiers are made from scrap puff pastry, rolled out and coated in lots and lots of coarse sugar, and then folded up, so that when you slice them up to bake, they look like pigs ears or heartshapes. I did some circular rolls and plaited strands for fun, and used them for creating a presentation piece together with my pithivier. A good palmier should have a shine on it (acheived if you coat enough sugar and if you turned over the pastries in the oven at the right time) and be crispy when you bite into it. Mine were dull because I was very wary of adding the sugar. Chef Michael was like...come on, more sugar, more sugar, more sugar...haha...
Today is really quite a good day I must say. And we're almost halfway through the term :)
10 November 2010
Baking Boot Camp
I'm currently reading Baking Boot Camp - Five Days of Basic Training at The Culinary Institute of America. Got it from the school library on Monday. It's a pretty cool book - written in 1st person narrative, as the author Goldstein writes about her personal experience attending the boot camp. The book also has pictures in each chapter that illustrate some baking techniques, which is good because I am more inclined towards pictorial and hands-on learning. Just wish there was less narration on all the kinds of rich dinners and high teas that they has during the course and more on the actual baking processes themselves.
The most disturbing thought that ran through my head when I was reading the book was that the chef would always ask the students to go for their meal breaks while s/he watched the oven for them. Hopefully it was just for the boot camp and not for the actual lessons held at the CIA! Over here, we're always reminded that we have to take ownership of our own products in the oven. We don't just leave them there and expect our chef to watch it and take it out for us. Of course Chef also always reminds us to have teamwork and let our kitchen mates know if we see that their product is baked and needs to be taken out, because sometimes we tend to forget.
Anyways, book aside, looking forward to tomorrow's class on baked cheesecake. Did some design sketches and got some inspiration from the Internet - hopefully tomorrow I have enough time to try out my decorations on the cake. Time management, time management...
11 November 2010
Baked Cheesecake
We did just one product today - THE BAKED CHEESECAKE. The cheesecake originated from USA, but since then so many countries have come up with their own versions of cheesecake. My personal favourite is the ultra light Japanese cheesecake - just plain with lemon zest. Don't like those with matcha or blueberry or some other flavours. I kinda always love the original taste. Just like I love the 'ol French vanilla ice cream flavour. But anyways, we made the American version today.
I tried doing a peacock chocolate filigree but the feathers didn't achieve the fan effect that I was hoping for 'cos I piped it too thin and it snapped when I took it off the silicon paper. But now I know what works and what doesn't.
The cheese filling was quite nice, but I didn't like the biscuit base. I think the crumbs used were a little on the coarse side. But anyways, this is a pretty easy recipe to follow and a large part of the lesson focused on decoration and presentation, which is why we only baked one product today.
The cheese filling was quite nice, but I didn't like the biscuit base. I think the crumbs used were a little on the coarse side. But anyways, this is a pretty easy recipe to follow and a large part of the lesson focused on decoration and presentation, which is why we only baked one product today.
12 November 2010
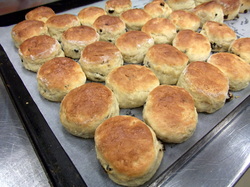
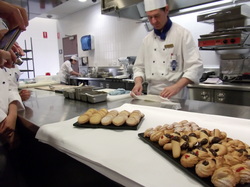
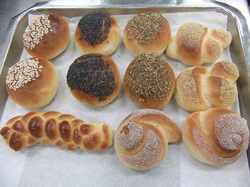
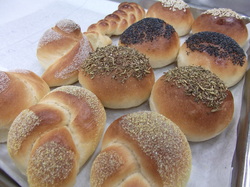
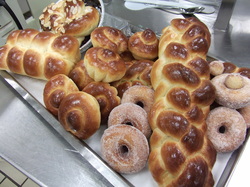
Soft and Crusty Bread Rolls
We moved into bread today. Yummy! This is my favourite section. During the demo Chef showed us white bread, soft and crusty rolls, as well as how to roast huge slabs of beef. Not a fan of beef really, especially when I have to see them in huge raw slabs - I think it was two whole slabs of sirloin that Chef roasted. White bread was also just a demo too, but we got to taste the bread and that was my favourite. I'm so gonna make it when I get home!
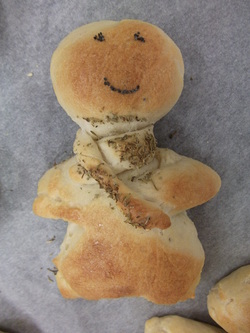
Making the bread by hand was tiring but fun. We had to knead it for over half an hour by hand, do the window test, prove the dough, punch down/knock back to release all the carbon dioxide bubbles trapped inside the dough during proving, and then we had to shape it. We did round rolls, knots, plaits, snails...any shape you liked, but time was really against us so we didn't have much time to be creative with design. I did manage to make my little snowman which I thought of doing last night though. :)
We also coated some of the breads with white sesame seeds , poppy seeds (Ilove these! Such a pity they're banned in my country), polenta, mixed herbs (I smelt rosemary in them...lovely...)..and some just with a simple dusting of flour to create a basket of breads of different textures, shapes, colours.
13 November 2010
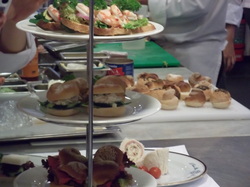
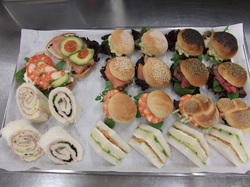
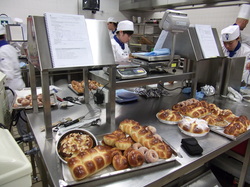
Savoury Bread Rolls and Petit Sandwiches
Today was a pretty relaxing lesson. We were tasked to fill up the rolls we made yesterday with an assortment of savoury fillings. The focus was on presentation. Chef Luigi said the first impression is the most important impresson, and presenting products in a way that looks appetizing gives you a leg up in terms of the taste factor.
We were supposed to do various combinations such as salmon with cucumber, roast beef with horseradish, ham and cheese etc, but Chef was really nice and let us come up with our own creations. Anyways, the products turned out pretty well. Chef had the 3-tier stand to present which was really cool but we didn't have any in the kitchen so we just had to present on the trays.
I still like the soft rolls with the filling - just feels more palatable...

18 November 2010
Croissant and Brioche: Halfway
We made croissant and brioche dough today. Plus almond cream. And It was a pretty relaxing, unhurried lesson. I received my second theory test marks - I got 76/80 but it didn't get me excited. I've come a long way to train to be a pastry chef at Le Cordon Bleu and I will put in my best effort. It's a short post today because like all humans, I have my share of down days too.
19 November 2010
Brioche and Doughnuts
It was a fun lesson today. Brioche (pronounced as bree-osh) is a highly enriched soft French bread, and comes under the "rich dough" category because it contains lots of eggs, butter, milk and sugar. These are ingredients commonly found in rich doughs unlike lean doughs which don't have these ingredients or only have them in very limited quantities. It is usually eaten at breakfast, and can be eaten plain or most commonly filled with chocolate (we did one with hazelnut filling also). Sometimes, it is also served savoury, such as with a foie gras stuffing.
Because of all the liquids in the dough, it can be a sticky affair when kneading it. But that's the way it's supposed to be! Don't be tempted to add flour to reduce the stickiness 'cos you're just gonna get a dry bread at the end if you do that.
We made quite a few forms of brioche. There was the brioche parisienne or brioche a tete - which has a traditional flute-shape and a round ball on top; brioche nanterre - which is a cluster of 8 balls, brioche tressee - which is a plait, and other forms of brioche such as a two-plait rolled into a ring etc. I loved moulding the bread shapes today 'cos I finally got the technique on how to roll the dough into perfectly round balls. Awesome. I also asked Chef to show me how to do a 6-plait even though he only showed us a 5-plait in class, but honestly the 5-plait looks so much nicer than the 6. Maybe it's just a personal preference that's all. Wonder if there is a 7-plait or 8-plait. That would be interesting to make. I thought the bread turned out pretty nice so I gave my 6-plait to Chef Michael to thank him for showing me the 6-plait, and my 5-plait to Chef Joel for teaching us so many things during practical, such as heating up an empty tray before putting the brioche parisienne to bake so that they would get a really high lift. We were baking at 180 on the top and 190 on the bottom today but Chef said we could probably go up to 195.
Anyways, this is Chef showing us how to make the brioche parisienne and also the stuff he baked. You have to first shape the dough into 40g balls, then use your last finger to roll it on the bench to get the little head, sit it in the tin and then use your index finger (coated in flour) to press all the way down along the inner circle. Chef also did one round brioche with pat cream which was yummy. It's really funny during class these days because somehow the past couple of recipes in the book didn't give the temperatures and times to bake the products, and Chef would always get asked about it, and he'd always reply "when it's baked" (with a cheeky smile). But I guess he wants us to know that baking times aren't fixed - it depends on the oven you are using.
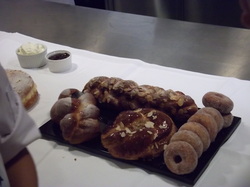
And this is what I made for my presentation...
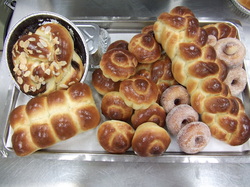
Edna and me were one of the first to present in class, so we had lots of time to snap photos, heh. I think we work really well as a team and our teamwork grows stronger with each lesson. Today whilst she fried our doughnuts I eggwashed our doughs to be baked, so we got the job done really fast. We also moulded our doughs in the same sequence so we could prove and bake the breads at the same time. You could see some benches doing everything individually i.e. frying their own doughnuts, not sharing trays for the same products etc...it doesn't help 'cos the breads are of different shapes and sizes and you're just gonna get some underbaked and some overbaked if you put them all in the same tray. I will miss her lots when she's gone next term. :(
The day also ended on a very good note when I got home after class, checked my email, and saw that I aced the group presentation that we did a couple of weeks back on "developing and updating knowledge on the hospitality industry". The effort put in was definitely worth it!
20 November 2010
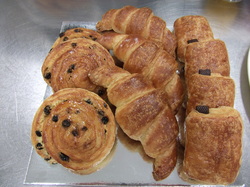
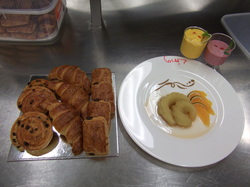
Croissants, Pain au Chocolat, Fruit Snails and Other Breakfast Items
We got the croissant dough going today. Punched down, shaped, proved and baked some lovely croissants, pain au chocolat and fruit snails. My favourite were the fruit snails. Anyways for the croissant and pain au chocolat, we're supposed to roll the dough out to 3-5mm thickness. I rolled out to 3mm but the doughs looked kinda smallish after proving and baking. I'll probably try 4.5-5mm next time. The dough for the fruit snails can be slightly thinner at 2.5mm - that was not a problem and turned out perfect.
We also made other breakfast items such as poached apple with orange segments and some fruit smoothies. I didn't think much of the poached apples before I made them, and I always thought it was crazy of people to pay a few tens of dollars for a silly little cooked apple. This is my first time making as well as tasting them, so I was pleasantly surprised when I tasted it. It's actually really yummy! I also made a design with cinnamon powder - cut out a little design this morning before going to school as I was browsing the Internet for some ideas on decoration. As for the smoothies, they weren't to my fancy. Had a go at the strawberry and tofu blended one..ugh..the mango one tasted a little better as the tofu was substituted with yoghurt.
The downside of today's lesson? The whole class forgot to put cream on our poached fruit dish. That's really bad..we have to be more careful in future...And I curled my croissants the wrong way...so pissed off with myself, but lesson learnt. Our sauce for the poached apples also wasn't reduced enough, so it had a watery texture, so I'll have to work on that next time too. But overall, still a good lesson with many things learnt.

24 November 2010
In the Mood for...Blogging
Another week gone by. Nothing eventful but there were a couple of small things that I thought of jotting down.
The best news of the week? Edna's staying! :) Way to go my dearest partner!
I've been doing abit of part-time work at my landlord's sandwich shop so I've got a little spare cash on hand. Decided to be a little "adventurous" and bought some butter beans from Golden Banana supermarket yesterday.
The best news of the week? Edna's staying! :) Way to go my dearest partner!
I've been doing abit of part-time work at my landlord's sandwich shop so I've got a little spare cash on hand. Decided to be a little "adventurous" and bought some butter beans from Golden Banana supermarket yesterday.

They look exactly like the french beans you find in Singapore, except that they've got a nice creamy butter colour. They looked so yummy that I had to buy a little tray pack costing $4. Haven't tried it yet though. I'll probably cook some fo dinner tonight.
This week I also realised that studying can actually be quite fun if you enjoy what you're studying. I'm halfway through my theory exam revision which is in two weeks' time, and I've prepared my workflow sheet for my practical exam. Feeling good about it, especially my workflow sheet.
Today is a perfectly sunny day just like the past few days, so a dead possum and an improperly extinguished bbq pit at the park weren't exactly the nicest things to greet me on my morning run. But oh wells, the day is still great so far.
And if I could end this post of pretty much unconnected thoughts, I'd say I'm excited to be hanging out at the beach this weekend. :)
25 November 2010
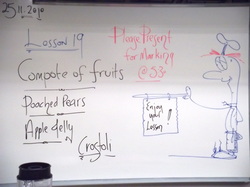
Berry Compote with Apple Jelly and Crostoli
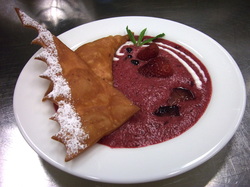
Welcome to Lesson 19. We made a berry compote today, which is basically like a fruit stew. We first boiled some strawberries, blueberries and raspberries in a liquid made up of cabernet sauvignon, apple juice, sugar, orange peel and juice, vanilla bean and pectin. Pectin is a natural thickening agent or stabaliser extracted from citrus fruits. Then we chilled and blended it.
We also made some apple jelly to go with the soup, which had gelatine powder to set the jelly. And we made some Crostoli, which is an Italian crispy deep-fried pastry. Chef taught us to do 2 Crostoli designs during demo, so I did those two, but I also tried some other designs which I thought of. In the end, I used my own design for my presentation piece because I thought it looked more impactful and different from the rest of the class. Here is what I did. I cut out the semi-circles on the Crostoli dough with my parisienne spoon (this is like the kind of spoon you use to make little melon balls. But I think maybe I should have made the triangle smaller...it kind of overwhelms the soup a little..Chef also told us at the end of the lesson that to get your strawberries standing upright instead of sinking into the soup, they usually put a flat cut piece of strawberry on the base first and sit the whole strawberries on top.
Today's lesson is really about presentation. And also gradually we're learning how to combine different ingredients on a plate to give a good balance the overall taste. For example, in this lesson we have a pretty mushy, soft soup, so we add in some crispy Crostoli pastry to balance out the textures. Just like coffee with armaretti biscuits I guess.
We had Chef Keith for the first time today. He's from England and an interesting chef..and he knows quite alot about Singapore too! Anyways he did this cool drawing for our practical today.
I didn't like the soup. The Crostoli wasn't too bad - nice for a snack when you aren't hungry but just feel like having something small. We actually finished half an hour ahead of time so I went over to Kitchen 5 to have a look at the other students' designs. It's good to see all the different designs so you can learn what not to do, and also pick up some new ideas at the same time.
Yup, time to turn in and get a good night's rest for tomorrow's lesson. Chef said if you smile when you're making your pastries they will turn out nicer. :)
Yup, time to turn in and get a good night's rest for tomorrow's lesson. Chef said if you smile when you're making your pastries they will turn out nicer. :)
26 November 2010
Poached Pear Tart
Again, another poached fruit dessert today. Another dessert that focuses so much on presentation. Remember the poached apples we did just last week? Well, we made poached pears this time round. We usually use firm fruits that will hold their shape after poaching such as apples, pears, figs, peaches.
This poached pear tart is really yummy. It's made up of 4 different parts - the sweet tart base, two layers of creme patissiere, a dacquoise (pronounced as dah-quah) layer sandwiched in between the creme pat, and finally the poached pear slices on top. Making the sweet paste and the creme pat was a good revision for all of us, because we have to make these two as well for our fruit flan during practical exam in two weeks' time. The recipe called for the creaming method to make the sweet paste but I did it the rub-in method way as I prefer the latter, and it turned out good too. Dacquoise is actually a cake made from layers of meringue and whipped cream or buttercream. However, today we just made dacquoise disks which is the meringue itself. It has a soft sponge-like texture. As for the pears, we poached them yesterday in lots of cabernet sauvignon and let them soak in the liquid overnight so that all the flavour would be infused into the pears. The wine's also the reason why you get the lovely maroon colour on the outer layer of the pear slices, and it makes a beautiful contrast to the whitish inner layer of the pear which hasn't soaked up the wine.
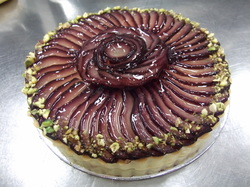
This is what Chef made during demo. The way he arranged the pear slices is so neat!
This poached pear tart is really yummy. It's made up of 4 different parts - the sweet tart base, two layers of creme patissiere, a dacquoise (pronounced as dah-quah) layer sandwiched in between the creme pat, and finally the poached pear slices on top. Making the sweet paste and the creme pat was a good revision for all of us, because we have to make these two as well for our fruit flan during practical exam in two weeks' time. The recipe called for the creaming method to make the sweet paste but I did it the rub-in method way as I prefer the latter, and it turned out good too. Dacquoise is actually a cake made from layers of meringue and whipped cream or buttercream. However, today we just made dacquoise disks which is the meringue itself. It has a soft sponge-like texture. As for the pears, we poached them yesterday in lots of cabernet sauvignon and let them soak in the liquid overnight so that all the flavour would be infused into the pears. The wine's also the reason why you get the lovely maroon colour on the outer layer of the pear slices, and it makes a beautiful contrast to the whitish inner layer of the pear which hasn't soaked up the wine.
This is what Chef made during demo. The way he arranged the pear slices is so neat!
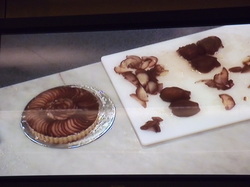
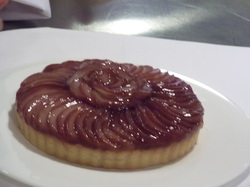
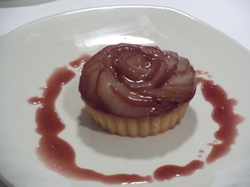
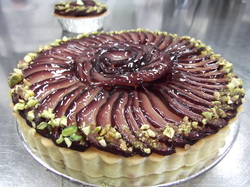
And this was what I made during class. Chef got us some pistachio nuts which made a really nice colour contrast - it looks really chrismassy as well with the red and green...
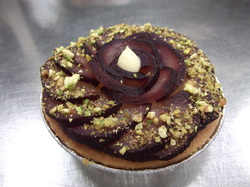
And finally this is my two tarts with Edna's tart.
I also tried reduction of the red wine sauce again today and I succeeded this time. But we didn't get to use it though, 'cos there weren't any plates to present our mini tart and do a little plate decoration. I was hoping for that as I had already thought of a design to do, but oh wells, I'm sure there'll be a chance next time.
I'm quite happy with the way I arranged my pear slices, but still a few things to take note of and work on. One: more pat cream on the second layer just to give the tart a little more lift and more impactful appearance. I made it too flat in today's class - should have left a very slight hump perhaps. Two: always be very careful with the tart when holding it in your hand. It's brittle!
I'm thankful to be here, learning so many new things about patisserie.
27 November 2010
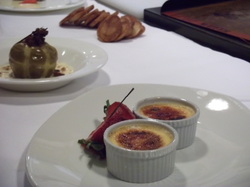
Creme Brulee, Baked Apple with Stuffing and Tarte Tatin
Today wasn't such a good day. Chef didn't have a good day during the demo. I didn't have a good day in the kitchen too.
First up is creme brulee (pronounced as cram bru-lay). This is a dessert made mainly with eggs, sugar and pouring cream. It is baked in ramekins, in a bain marie in the oven at a low temperature of 150 degree celcius (same temperature as when we baked the cheesecake). Watch your oven as the dessert will collapse if you overbake it. Commercially, it is usually made the day before serving, and sprinkled with sugar on top and caramelised with a blow torch just prior to serving. This caramelisation gives the dessert a nice crunch on the top which balances very well with the smooth creamy texture of the creme brulee. The important things to note during this process of caramelisation is to sprinkle the sugar evenly over the top and also not to hold the torch too close to the surface otherwise the top will get too burnt. This is Chef's demo product.
First up is creme brulee (pronounced as cram bru-lay). This is a dessert made mainly with eggs, sugar and pouring cream. It is baked in ramekins, in a bain marie in the oven at a low temperature of 150 degree celcius (same temperature as when we baked the cheesecake). Watch your oven as the dessert will collapse if you overbake it. Commercially, it is usually made the day before serving, and sprinkled with sugar on top and caramelised with a blow torch just prior to serving. This caramelisation gives the dessert a nice crunch on the top which balances very well with the smooth creamy texture of the creme brulee. The important things to note during this process of caramelisation is to sprinkle the sugar evenly over the top and also not to hold the torch too close to the surface otherwise the top will get too burnt. This is Chef's demo product.
Secondly, we made baked apples, filled in the centre with a crumble made up of dried fruits and nuts, sugar, and butter to hold the mixture together. We learnt about basting, a method of cookery where the product is left to cook, and then periodically coated with juices or some other liquid such as a sauce. In this instance we brushed the apple with melted butter. This helps to keep the apple moist as well as give it more flavour. This is what I made. The white sauce below is called creme anglaise, which Chef made for the class to use earlier on. We will be learning how to make this sauce next week.
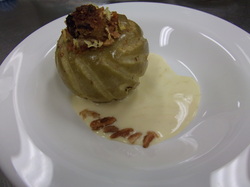
Lastly, we made tarte tatin (pronouced as tart ter-tan). This is an apple tart baked upside down: the sauted apple slices are arranged until the tin is full, then a 2mm thick layer of puff pastry is placed on top and baked. After it is baked, it is inverted onto a plate and may be drizzled with some of the leftover sauce used to saute the apple slices earlier on. For this dessert, do not be afraid to compress the apple slices as much as possible when you are arranging them. This will give a very even and nice layered look when the tart is baked. As for the sauce, make sure that you cook the sugar until it turns into a dark golden brown liquid before adding butter so that the apples will have a nice dark golden colour. This is Chef's two tarte tatins. The one in the background looks nicer 'cos it was baked in a higher tin and has more volume.
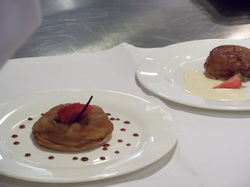
When working with pastry, knowledge and skills are not the only things that you need to have. You also need to be patient and be able to control the moods and emotions in the kitchen.
29 November 2010
Another Rainy Day but...Scones to the Rescue!
Up bright and early to shop for this week's groceries. The good thing about Woolies is that they open at 7am. So, it was still cold from last night, and there was the slightest drizzle ever. And I started dreaming of having scones with jam and chantilly cream and a hot cup of tea. And lo and behold I found a scones substitute at Woolies:
I'm not a fan of Tip Top brand bread, but these are thick scone toasts which looked so inviting that I had to try one out. They taste pretty good actually with a nice fluffy texture, though nothing like the real homemade scones.
Anyways, stonfruits season is in, bing cherries with fresh green stems, apricots in a lovely orange hue...and not to mention the lovely menindee grapes...I'm totally in the mood to make a fruit tart right now.
Ok, off to revise for my final theory exam on Wednesday.
Anyways, stonfruits season is in, bing cherries with fresh green stems, apricots in a lovely orange hue...and not to mention the lovely menindee grapes...I'm totally in the mood to make a fruit tart right now.
Ok, off to revise for my final theory exam on Wednesday.
02 December 2010
Pear Bourdaloue and French Rice Pudding with Rhubarb
Another pear tart. Again! Pear Bourdaloue is a classic French pear and almond cream tart, and it is usually made in its traditional design as shown below. I love almond cream - it tastes just as yummy as cream pat. Chef says these are the two things pastry shops will always have because they can be used in so many types of pastries. Anyways, I like this tart much more than the poached pear tart which we did earlier on with the pat cream and dacquoise base, even though I must say the previous pear tart looks more "upmarket", appetising and tantalising.
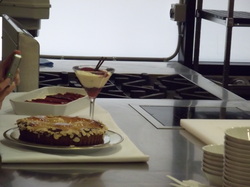
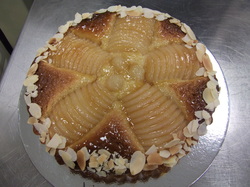
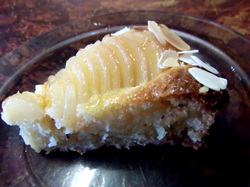
Today is also the first time I tasted rice pudding and rhubarb. Rhubarb by itself is very sour, but when you coat it in sugar and cinnamon and bake it in the oven it tastes quite nice really - a tinge of sour to balance nicely with the sweet rice pudding. We whipped up some cream to mix into the rice pudding after it was baked and it was good. Reminded me of eating baby food though haha - a little mushy, if I may use that word to describe it. I wanted to add some decoration to my rice pudding for presentation so I asked Chef to show me how to do caramel corkscrews. It is fun to do, although it was downright frustrating that the viscosity of the caramel seemed to change like the wind, hardening within seconds off the heat. I managed to do a nice one for my pudding, but a pity it wasn't as long as I liked it to be. I shall practice it more at home.
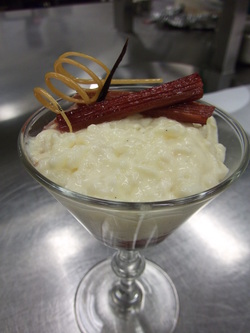
Overall, it was a good day today, and I've thought up my design for tomorrow's dessert. Two marks shy of a perfect score for today's theory test too. One last theory test to go tomorrow morning and one final practical exam next Friday!
03 December 2010
Orange and Almond Pudding with Tuille
Today seemed like a pretty easy lesson. Steamed pudding. Cream Anglaise. Tuille biscuit. Plate presentation.
The most difficult? The tuille. This is a very thin, wafer-like biscuit made with butter, icing sugar, egg whites and flour. Basically you form a paste and spread it out very thinly onto the back of a greased baking tray, and bake it for about 5-8 minutes depending on the size and shape. You can do the shapes with stencils or freehand, which is to cut the shapes after it has been baked. This is difficult because you have to work really fast and get all your equipment ready right by your side, because once you take it out of the oven to shape it hardens within a minute or two and after that happens you can't shape it anymore. You could pop it back into the oven to "soften" again but how many times can you do that given it's such a thin biscuit? It's just gonna burn sooner or later and tuille are supposed to be just a little brown, rather than baked until it's all dark.
Chef made these during demo today. The pudding is made by placing them in a bain marie to steam in the oven, and it takes pretty long to cook this - at least 50 minutes..
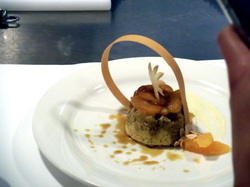
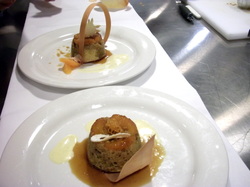
Creme Anglaise is a thick white sauce. It is made in a similar way to cream pat, except that it has thickened cream inside besides the milk, and it doesn't have cornflour or butter inside. You can test if it's cooked when it coats the back of a spoon without dripping off totally.
Important things to note in today's lesson: One, the pudding should be served warm, whilst the Anglaise sauce should be cold. Two, the candied fruit and tuille helps to give volume and height to the dish.
I was trying to create a high wave effect using the tuille and the Anglaise sauce, and this is what I made. I'm pretty pissed off with myself because Edna and me worked through the dessert fast and presented an hour ahead of time, so that we could use the spare time to have a second go at piping choux pastry before the exam next week. In my haste to get on with the choux pastry I forgot to snap a photo of my plate, which is why the tuille looks "in pain" in the photos below (it had already gone soft and lost its curvy shape sitting in the anglaise sauce for an hour). I think, I should probably have done without the syrup strands on the side though. Might have achieved a better result using a brush rather than a piping cone...god knows why I did that...do we all have crazy moments as chefs?
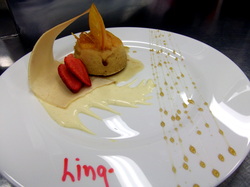
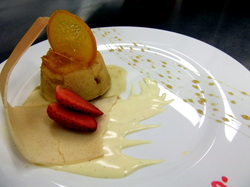
04 December 2010
Gateaux Japonais
Gateaux Japonois is a deliciously yummy cake made from layers of Italian meringue discs and buttercream. Chewy meringue with smooth buttercream. Wow, an awesome combination! The hardest part of making this cake is giving the whole cake an even layer of buttercream, and to make sure there's no shoulders or dome in the middle - all done just using a simple spatula. No turning plate or other equipment to help you. Keywords for cake-coating? Smooth, flat and 90 degree angles. It takes alot of patience, but Chef said coating cakes is something pastry chefs have to do almost every day, so it's a valuable skill. Chef got three cakes done in 2 hours.
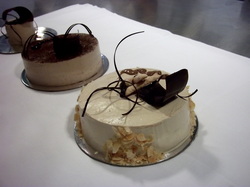
We were given 3 hours to finish and present just one cake. It's my first time doing this so I took quite some time to achieve a considerably smooth buttercream finish. Actually, I watched some videos last night on doing chocolate cigars and I was going to line them up all around the cake, plus do a chocolate nest in the centre, but there wasn't enough chocolate in the kitchen. So, I had to think of another design. Which I really didn't seem to be able to think of. I didn't really want to use the acetate (which is a thin plastic sheet you spread your chocolate on and twist the sheet until the chocolate sets, so that you have get chocolate curls like those in the picture above), because the designs that come out from using these sheets are pretty similiar. That's why I wanted to do the chocolate cigars. I did some cigars anyway, and just did a simple decoration on top. To fill up the empty space, I decided in the end to just write the cake name on it. During presentation, Chef said that it was a good idea to write the cake name..nobody else in class did that. I'm also glad I did the writing because Chef saw me writing and showed me how to hold the paper cone with two hands to write because with one hand it's going to be shaky. Oh man, Chef's hand shakes so much when he writes with just one hand...effects of drinking too much?? Anyway, I noticed that all the chefs like to write with big curls in their letters..it has that flamboyant and full-of-flair effect...
One of my classmates did a small mushroom patch as her cake design, which was really awesome. She piped some small meringue shapes to form the mushrooms. A pity I did not manage to snap a photo of it but it was really good aesthetically - my favourite and probably also the most attention-grabbing cake in the class. If I wanted to buy a cake, I would pick that for sure.
I think my cake looks a little simple. It probably would have been nicer if I gave it a dust of cocoa powder and coat the edges with almonds (this is a good way to cover up if you don't make the cream layer that smooth heh). Nonetheless, I'm still proud of my work today. It's a good start and I'm sure it will get better with more practice.
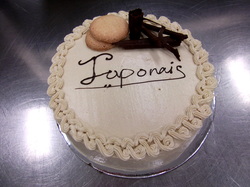
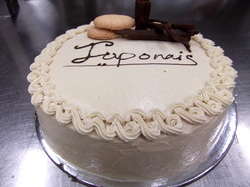
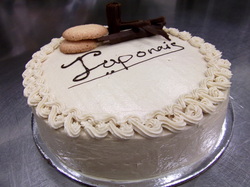
And the good news which came in my email this morning? Full marks for my last theory test and full marks for my second written assignment on culture. I'm not sure whether to laugh or cry actually...
06 December 2010
Before the Exam...
It has been a wet start to the summer, but today against all odds the sun shone and kept the rain at bay. A couple of free days before th exam, so I thought I'd make a trip down to Rhodes to look for some baking tools. As it is nearing Christmas, the buses have all been dressed up, which is pretty cool.
It was a fruitful trip I must say, as I managed to get quite a few tools which I hadn't been able to find, especially my set of round cutters which I have been looking high and low for. When all that was done, I saw that the bus had left 5 minutes earlier and the next one would be another hour away. So..not one who likes sitting around waiting and wasting time, I decided to take a walk back. You know, it's just a 6 minute bus ride but it takes around 40 minutes to walk. But it was a nice walk 'cos I got to cross the parramatta river on foot! (Oh no I'm not Moses who crossed the Red Sea..there was a sturdy bridge to use..)


10 December 2010
Couverture Chocolate Figurines and a Long Exam
We had our lesson pushed back till 10pm on Thursday, as the kitchens were being used earlier in the day for examination purposes. Thursday was quite a relaxing lesson as we worked with a little chocolate, making three types of ganache for Saturday's chocolate moulding, and also doing some chocolate figurines. I am certain the lesson was designed as such to calm our nerves for today's practical exam. Anyways, this is what Chef Gert made during demo with the plastic moulds. He also did a figurine using his ancient metal "golden boot" mould, but subsequently proceeded to chuck it back into the chocolate mixture as he needed some more chocolate to show us how to use transfer sheets.
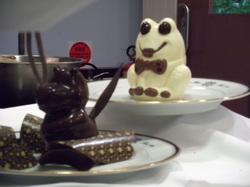
I think I said previously that I liked using vaccination method to temper chocolate (and many people said that too at the start of the semester 'cos it seems easier and less messy). But I really like the way Chef Gert uses his scraper to table the chocolate..he makes tabling look neat, fast and successful. I've already tried tabling a couple of times and it does seem to work better than vaccination - this method is my favourite now.
I did a little hippo figurine in class. It looked a little plain on its own so I decided to do some decoration and add some words on the hippo. I wrote it the wrong way first time round..and when I turned the mould round the front to check whether my letters were clear, I realised my mistake. You have to write the letters backwards! One of my classmates drew a bikini on the hippo, which was real funny and cute too!
I did a little hippo figurine in class. It looked a little plain on its own so I decided to do some decoration and add some words on the hippo. I wrote it the wrong way first time round..and when I turned the mould round the front to check whether my letters were clear, I realised my mistake. You have to write the letters backwards! One of my classmates drew a bikini on the hippo, which was real funny and cute too!
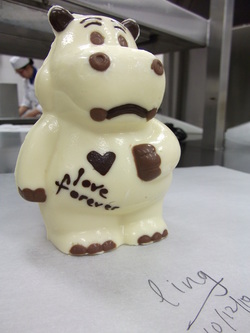
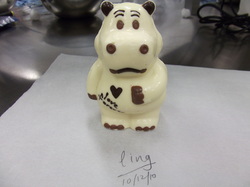
The tricky bit about these figurines is making sure that there are no little air pockets when you are applying the chocolate onto the mould. You can make sure this doesn't happen by cleaning the mould thoroughly with mousseline cloth or cotton wool, and by making sure your chocolate is of the right consistency (not too thick or thin). If you happen to get air pockets, you can rectify it by brushing some chocolate over the holes after the chocolate has set and is ready to be taken out of the mould.
So we ended class late yesterday. Edna bunked in with me for the night because she stays too far to make it at 7am for the exam today. Nervous, been through the workflow a thousand times in my head, couldn't sleep the entire night, up by four-ish and at school by half past six. That was just the start of a long day.
We had to make 1 fruit flan and 10 coffee eclairs for our assessment today. My pat cream failed me the first time. I was careful and made doubly sure I cooked it out properly before sending it off to the fridge. The mistake I made? There wasn't any space left in the inner parts of the coldroom so I had to put it right at the entrance. With people opening and closing the door a million times, my pat cream never got the chance to cool properly. (The fridge temperature went up and you'd be grateful it didn't break down) When it was time for me to take it out to whip up, it was cold and jelly-like on top as it should be, but still hot below. But I ignored that warning sign and proceeded to whip it up. Unwise decision - turned out too watery. So, thank god I had an hour to spare and I quickly made up another round of cream and it was perfect the second time.
My eclairs...I made a stencil for my eclairs but the 2cm width I gave it, plus the eggwash to flatten the paste, made it a little too fat when it came out of the oven.
Tempering of the fondant for the eclairs went well, surpirsingly. I was apprehensive of this but I had Chef's wise words of wisdom running through my head all the time - don't overheat, always keep it below 37dc and then slowly temper it until it reaches 37dc.
At the end of the assessment, we were given some individual feedback. I passed but honestly, I was disappointed with myself. I know I could have produced much better products. Chef also said that my class performance is of a higher standard and that it was probably due to exam stress that I didn't manage to deliver the same standard as what I did during normal class. Perhaps some people are happy as long as they pass but I really hate the feeling of not doing as well as I know I could have done. But anyways, it is time to move on and I will work even harder for intermediate level.
12 December 2010
Hand Moulded Truffles
The last lesson of Basic Patisserie ended on a sweet note with hand moulded truffles - dark, milk and white chocolate truffles coated in coconut, crushed hazelnut, pistachio and almond flakes. It was a relaxing and fun lesson, and we got a chance to practise tempering the different chocolates again. Did tabling again. Chef Michael made these yummy truffles during demo.
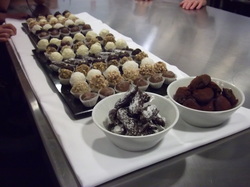
And Edna and me made these...
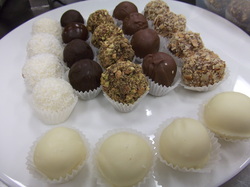
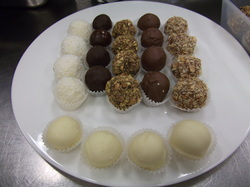
Looking forward to Intermediate Patisserie next semester. :) Check back in February 2011!
Welcome back!
Please click on the link "Mu bread and butter dream" at the top right hand corner for Intermediate Patisserie.
